As more sandstone arrives at the site of our new house, a few reflections on it in general.
As you can see, the sandstone comes in multiple different colours, or perhaps just multiple shades of brown, from nearly white to very deep brown.
This was one of the choices we had to make at the quarry: any colour? Dark? Light? In the end we asked for anything except the really dark-coloured blocks.
A lot more arrived today.
The decisions aren’t just about colour, though. We also had to decide upon the face (“rock face”, or “Hydrosplit”) and whether we had “Quoins”, which are the corner pieces. If you have these (as we will have) they are the corner pieces which stand out a little, alternating short and long sides as you go up or down the corners.
These are the quoins, waiting to be used.
The walls have just begun to go up, and Michael Edwards is worried about how much we like the sandstone.
We are actually very happy with it.
Here is the first view that we will get about what the house will look like when we finally move in.
I realise that the model railway which I have built in our cellar is almost entirely only for my own amusement and satisfaction. I had originally aimed that our two sons would develop an interest in models, railways in particular (though I also tried cars, boats and a hovercraft). They being Australian boys, though, their interests turned to outdoor games. Actually, in the long term this is almost certainly much better of course: both Andrew and Nick still play hockey/cricket/football. On the other hand, the only other person whom I know to be an interested reader about my models is brother John, so this page is dedicated to him. John has been kind enough to appear enthusiastic about my achievements, and although he only actually sees my railway once every few years (when he visits Australia), he has maintained an interest. A modeller-by-proxy, perhaps?
Mark outlined on his page the origins of the family interest in railways, and I will write a little about model railways. When Mark and I were small, our Dad bought us railway engines for “00” gauge, and I can remember installing a floor in our attic of the house in Woolton, Liverpool, which was largely done so that we could have an “00”-gauge railway up there. Such a railway was built, and we spent many hours up there subsequently. There were echos of this thirty years later when I paved our cellar in Mount Riverview NSW for very similar reasons. Mark (and Dad, I think) were mostly interested in simply seeing the trains run around, with lovely rolling stock (engines, wagons and coaches), timetables and operating schedules. I, however, was always more interested in the details of the models and the scenery/surroundings. I was later bought a smaller scale as my own railway in 3mm-to-the-foot or “TT” scale. John was later started in 2mm or “N” scale.
My interest in detailed model construction led to the construction of model locomotives in “00” scale/gauge, but this proved conceptually unsatisfactory because for obscure commercial reasons the manufacturers of ready-to-run models had created this anomaly: 4mm scale on 16.5mm track: the wrong scale:gauge combination – in 4mm the gauge should be 18.95mm. Originally the 16.5mm gauge track was made for “H0” scale (3.5mm), which is correct. “H0” in half “0-gauge”, you see. I hated the idea of spending hours making a model when I knew that the gauge would be all wrong …
That, combined with the greater detail available in 7mm scale led me to want to build in 0-gauge. Moving to Australia, and having two boys as children, gave me the excuse to get going. So I paved the cellar, and set off in 7mm scale, 32mm gauge. I laid a 4m circle of track on shelves in the cellar. My protestations that my 0-gauge railway was built for the small boys’ benefit was rather undermined by Sue seeing the sticker on the outside of one of the model kits, saying “This is a scale model, not suitable for children under the age of 14” !!! Anyway, I persisted, but has any reader noticed the problem? It took me a rather embarrassing length of time to realise, but the scale:gauge combination is still wrong and the gauge should be 33mm !!!!
33mm gauge/7mm scale is called ScaleSeven. I joined the Scale Seven Society (membership about 300 people, worldwide), took up all of the 32mm gauge circuit and rebuilt it in 33mm gauge, then re-gauged three locomotives and about half-a-dozen wagons. I deny being at all autistic, just seriously obsessive, and it had to be right. These video pictures are of the model railway which I have built since.
Here is a sequence showing the locomotive going through the coalyard of my model colliery. The train is going unrealistically fast in scale speed, of course.
I have just added three more coal trucks to the fleet, and had an interesting experience yesterday as I tried to have the train to twelve coal trucks pulled around the circuit by my model Peckett 0-4-0 saddle tank (actually originally built by my father and John, for Nick, since repainted by me. My layout has a hill on it (not all railways are perfectly flat …..) and the Peckett could not pull the train up the hill:
As you see, wheelslip occurred and the train ground to a halt. Clearly a more powerful locomotive was required. As several real colliery owners did in the UK in the 20th century, I turned to a Garratt articulated locomotive:
My model Garratt has two motors, just like the original articulated locomotives did, and the greater power available means that the gradient was easily conquered.
There is a scenic section on my model railway, also, and the final video shows this:
The weather here has been lovely, although after the rain this rather beautiful fungus has grown on one of our bottlebrush trees.
Building seems finally to be getting under way properly.
The frames for the downstairs area are going up, and some of the steel beams have been erected.
The frames for the upper storey have arrived also, and have been stored above the garage, as seen here!
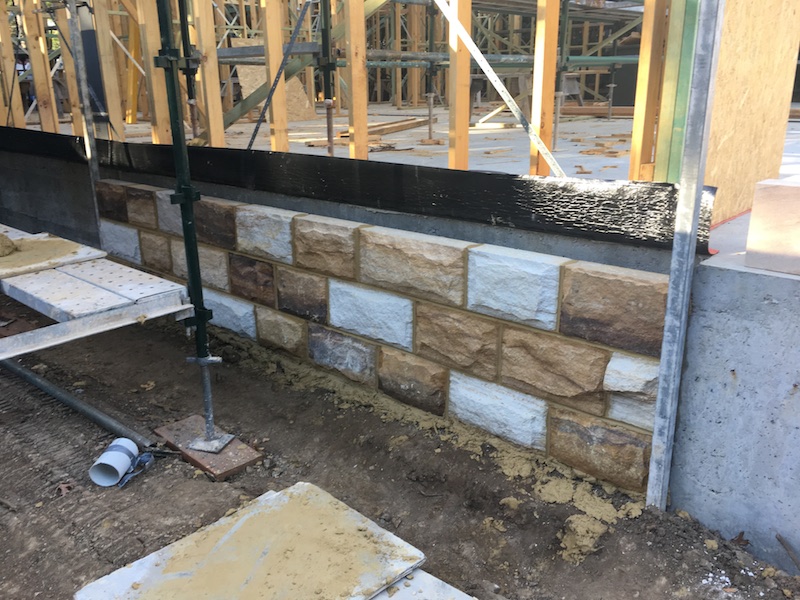
Then earlier this week the sandstone has begun to arrive. I must say that I hadn’t realised that buying sandstone would be so complicated: what colour do you want (well, sandstone coloured ….?); do you want “rock face” or “hydrasplit”; are you having quoins? Quoins are the corner pieces, usually alternate directions long and short sides, standing out a little from the main stonework with smooth faces. Hydrasplit means that five of the sides of each block are smoothed to help construction, but the sixth is left rough. All six sides can be smoothed of course, but we felt building that way you might as well use concrete …. Rock face means that each edge of the stone is split back to give an even edge.
The main stonework is shown here, with the rock face visible, and the different colours that the bricks will be. There are also some pinker parts, but I couldn’t find a good piece not covered in plastic to take a picture of.
Here are some of the quoins.
There is quite a lot of scaffolding around the house now, ready for the stones to be made into walls, I suppose.
It isn’t weathered yet, and there is no coal in the tender, but fundamentally it’s done. The final parts were fitting the cab doors, the coupling hooks and cab glass. Also I needed to stop the electrical shorting from the pony-truck wheels (the swinging small wheels at the front of the locomotive) to the front footsteps. This was achieved quite easily simply by putting little blobs of epoxy resign on the inside of the steps.
After this, testing on my reverse-curved test tracks showed really pleasing results – even running slowly it now seems to run smoothly.
Slow running is actually more important and more impressive, if you ask me [sorry about the music in the background, by the way].
Next will be either fitting Digital Command Control, or starting on the weathering.