The Glenbrook House 27 – Finale

This should be the last one in the saga of building the new house, because it is finished and we have moved in.  It is the end of 2018, so this is a good reason also.  We started the design part in December 2015 (having bought the previous house here back in 2010!), demolished the old house in November and December of 2016, and have been building ever since.  We still don’t have a proper telephone connection, we haven’t “settled” the sale of our house in Mount Riverview quite yet, but all else is pretty well done.

Christmas lights 2018


We have just had our first Christmas in Glenbrook.

Pool Christmas lights copy


Here are a couple of pictures of our Christmas lights.


It has been a beautiful Christmas season here in NSW, and a good time to portray the new house at its best:

47 PSt front Boxing Day copy

47PSt back Boxing Day copy


Pool and garden Boxing Day copy  We appreciate how lucky we are.

Glenbrook House 17 – progress inside

Recently, progress inside has in some ways been more exciting.

Small 47 Park Street 25th December 013


The main room floor has now been laid, although it won’t be polished for some time yet.


Small 47 Park Street 25th December 006


The kitchen has had all the black “Galaxy” grant bench tops installed.


Small 47 Park Street 25th December 011

This is the view from the kitchen into the main room.


Small 47 Park Street 25th December 015


The builder has also arranged installation of our fitted cupboards and the work-areas in Nick’s and Andrew’s bedrooms.

Small 47 Park Street 10th December 09


In some respects, though, this is the most important sight – the battery which will hold enough energy to power the house for a day, and the “inverter” which acts as an intermediary between the solar tiles and the battery, and works as a generator of alternating current.

Glenbrook House 16 – progress outside

In the initial stages of the building process, progress is easy to show in pictures.

Small 47 Park Street 26th November 05Small 47 Park Street 17th December 018
Small 47 Park Street 26th November 04

The outside is pretty much complete apart from the details now: the stonework is largely done, even the patio tiles are laid, and those on the front step – here’s another view of out grand entrance in construction.

The outside is far from done, though: the “retaining walls” had to be put in place.  I think that this is a council regulation with any building where the land is sloping, as ours does very slightly.
Small 47 Park Street 26th November 09


So as the outside of the building gets finished off, the builder has been digging trenches around the sides of the site, then pouring concrete into the holes.

Small 47 Park Street 3rd December 08


The builder has also been laying the foundations (!) for our garden hut, which is to be made to match the house – in sandstone!!  We could, of course, had a wooden one, of a prefabricated one made from aluminium panels (Colourbond™), but we decided on the usual no-compromise approach, so out garden shed is to be 4x3m and made of sandstone, with a gabled roof!

Small 47 Park Street 17th December 010


Here it is, without the roof as yet.

.


Stanier 8F in ScaleSeven – part 24: the “fall plate”

The “fall plate is (I think!) the footplate between the locomotive and the tender.  This clearly has to move up and down, and even on a model some movement will be necessary.

fall-plate-fitting-01
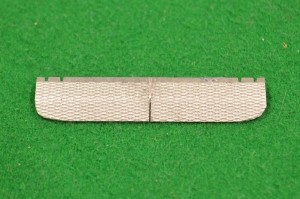
In the MOK kit the fall plate is an etched rectangular plate with the grip etched onto one side.  There are cutouts for the hinges, which were assembled onto the cab sub-assembly earlier.

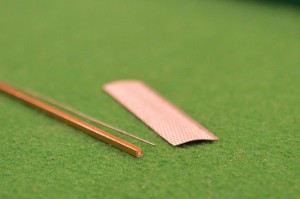
There were no instructions as to how to fit this part.  There is a second matching rectangle with no surface grip.  Both have a half-etched edge, but it is far from clear how this could be used.  I didn’t use the second plain etch.  I curved the etched plate (as seen above) and decided to hinge the plate by attaching a tube to the underside and using 0.5mm wire through the hinge-brackets.  I couldn’t find any small tubing in my scrap-box, but a U-shaped piece of brass channel made a better substitute.

fall-plate-fitting-03
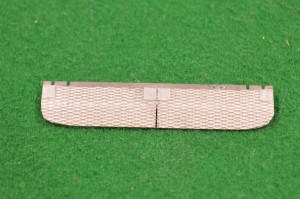
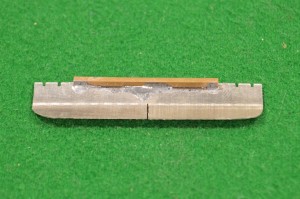
So I soldered a 35mm length of the channel to the edge of the fall plate, and then filed the rear edges of the plate to resemble the fall plate seen on p76 of the “Locomotive Profiles” book of the Stanier 8F (IMO an essential acquisition if you are going to make an accurate model).


fall-plate-fitting-02The picture in LP shows two fall plates, not one, so accurately to represent this appearance, once I had soldered the brass channel in place, I used a piercing saw to separate the two halves (well, actually not quite separate them, but create that appearance).


fall-plate-fitting-04


I then added the “hinges” by sticking paper squares onto the fall plate with cyano-acrylate glue.


fall-plate-fitting-05


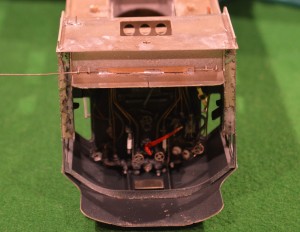
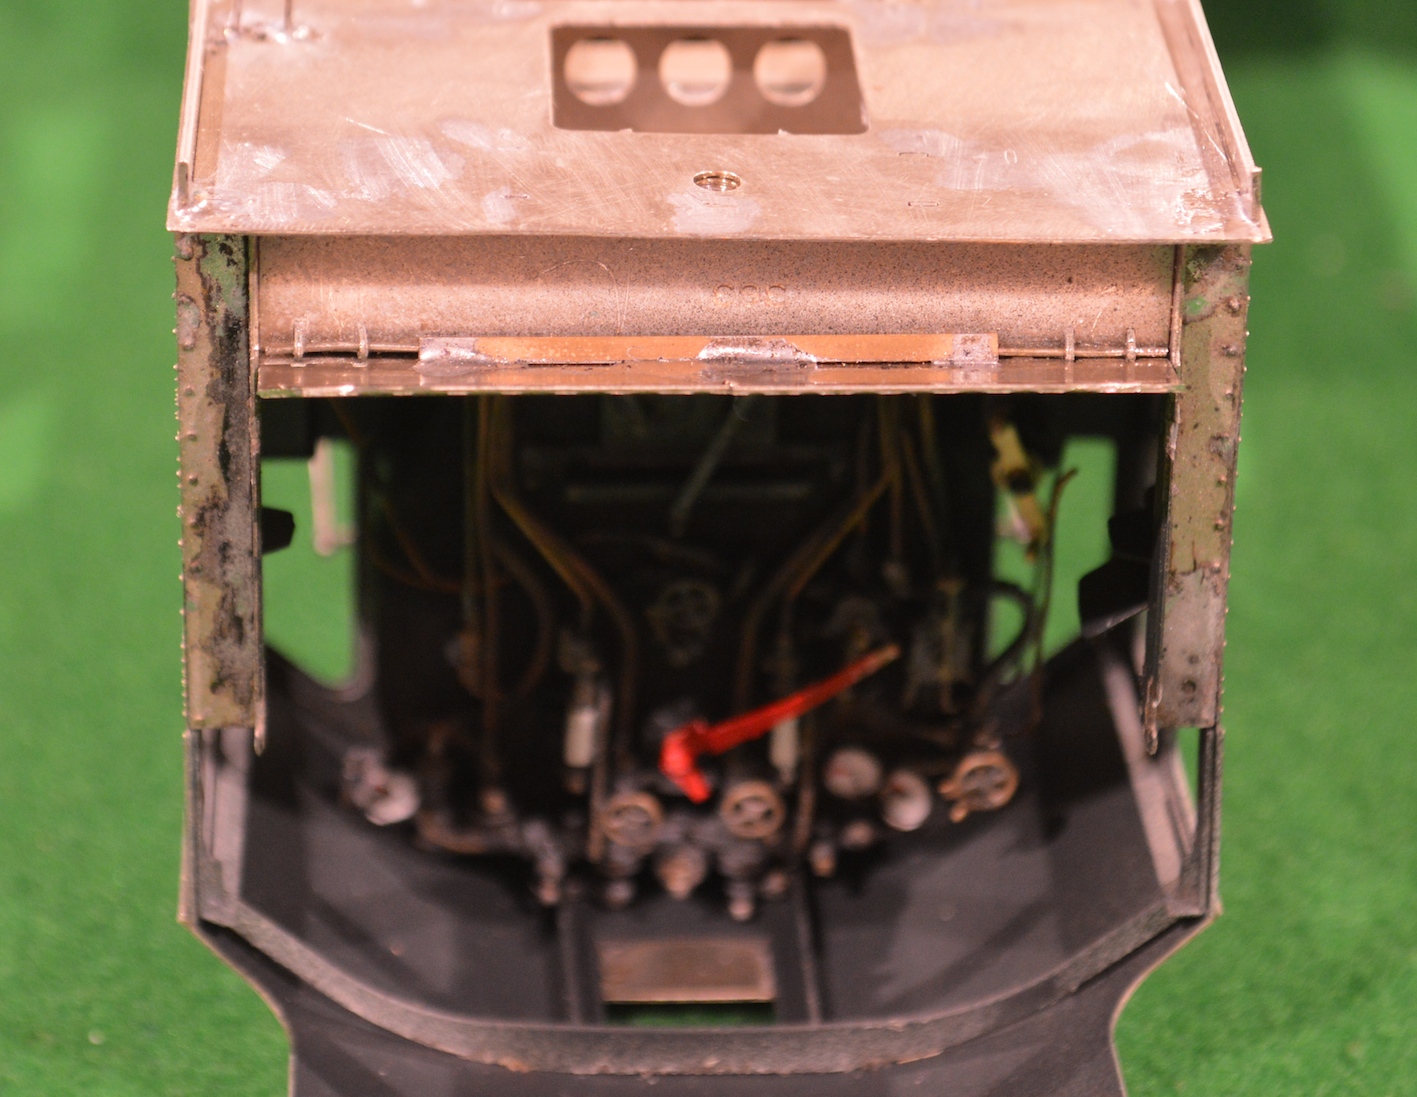
I then threaded the 0.5mm wire through one hinge on the rear of the cab assembly, then through the channel on the fall plate, then through the other hinge.  Easier said than done!


fall-plate-fitting-06


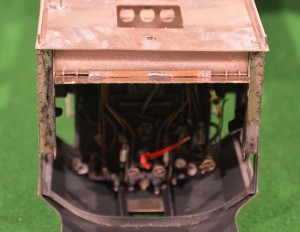
I then cut the wire just the right length to fit between the cab side etches.


fall-plate-fitting-07
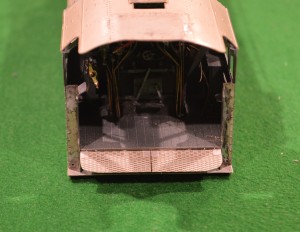
This gave the right appearance (I hope) with some flexibility to flap up and down.


Cricket, and psychology

I had an excellent day playing cricket yesterday.  Actually, it does’t sound much, 11 runs, but it was very good, for me.

I opened the innings for our side – facing the first ball – with a target of about 112 I think.  We had an opening partnership of 43, off about the first 15 overs (out of 35).  We weathered the storm of their opening bowlers, and not only could I defend, but this innings for the first time I managed the transition from pure defence to starting to attack.  I managed to pick the bad balls and hit them, whilst picking the danger balls and defending.  A few really good shots gave me confidence.  A nice square cut for two (I was disappointed it didn’t reach the boundary, it was hit cleanly but along the ground) and my first four.  Actually I have this vague recollection of accidentally edging a four a couple of seasons ago, but that doesn’t count.

Nick was there to see me bat, and says it looked good.  Even Dave Hadden, who is a very harsh critic, said that I played some good shots.  When I was out, it was to a pulled shot which went up in the air and was caught, but by that stage we had laid the foundations for what proved to be a successful run chase, and I either needed to accelerate the scoring or get out of the way of someone who could.

So I was pleased.  Ridiculously pleased.  Even several of the opposition (a really good bunch of blokes from Glenmore Park, many from “the subcontinent”) said I had batted well.

So what had changed?  Actually in some respects I think it is that I hadn’t been practicing so hard, and so in a bizarre sort of way didn’t feel quite the same pressure to show results!

I can hardly walk today, though, for my aching muscles.

Stanier 8F in ScaleSeven – part 20: tender finished (not quite)

Now in some respects I am very pleased with my progress, but in other respects quite distressed and appealing for help!
I have finished the tender, with reservations – it doesn’t run as well as it should and needs to!

As you can see, iSmall Tender complete not painted 05t looks OK (given that it isn’t painted).
However even on my S-shaped test track it de-rails: there is a compensation mechanism which should allow there to be free movement of the rear four wheels almost independent of each other but this doesn’t seem to work completely effectively. If it did, the six wheels would all be always in contact with the rail. However the front axle seem to be able to have one rim off the rail, and so with the small S7 flanges, it de-rails. Adding weight to the front end of the tender makes no difference.
I had been so careful …. !
At every stage of construction I had run the tender chassis up and down behind the locomotive and it ran without problems. However at the some stage it becomes necessary to put it all together, take a deep breath and solder it up in such a way that it cannot be taken apart to adjust it.

Small Tender complete not painted 06


By the time I had the water-scoop parts and the split-axle pick-up components all crowded together, it looks like this:


????????????????????????????????????

Click to enlarge

I dread having to unsolder it and take it all apart again!
It looks so good.

However looks aren’t everything, and unless additional lubrication of the moving parts frees up the mechanism and allows it to run over uneven track, what else can I do?

Trip to England

I (David) have just returned from a trip to England, and to Paris – the latter destination was to attend an Interventional Cardiology conference, and no more needs be said about that.

The trip to England started with the rather sad event of attending the celebration of Aram Rudenski’s life.  He died last year and David his partner had arranged this celebration of all he did and achieved.  Aram had, indeed, done a great deal.  He was probably the brightest person I will ever meet in terms of raw intelligence.  I am proud that he considered me a good friend.  Even during his long and often distressing illness he always asked about me and my family, taking a great interest in the boys achievements and joy in their successes.  I had not realised some of his abilities, or at least the magnitude of his abilities.  He turned down an Open Scholarship in mathematics in order to study medicine at Cambridge.  He still was awarded a First, even after only doing the final year in maths.  his DPhil. was awarded for mathematical modelling of diabetes, and remains the cornerstone of that form of analysis of the disease.

Small David at Burnmoor LodgeOn a more cheeful note, I went walking in the hills of the Lake District again.


Small John at Burnmoor Tarn


With younger brother John, we climbed over Burnmoor to Eskdale, from Wasdale.  A very wet walk.  I was calf-deep in the bog at one point!


Small Mark and John at Jennets Foss near Malham Cove


We also went on a walk around Malham Cove, the three brothers.


Also we went on a long train ride over the pass via Bethgelert from Caernarfon to Porthmadoc in Snowdonia.  This was on the Welsh Highland Railway, restored now to carry tourists over that journey, and truly spectacular it is.  Small WHR Garratt number 138 No 07We were hauled by one of the last Beyer-Garratts ever made.